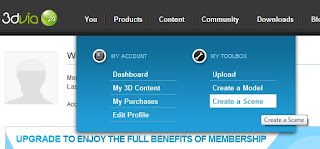
 You will then get a choice of prebuilt scenes of which you need to select one. Once you have selected a scene you can give it a name and add a description, you can also set options on if you wish to invite people to view this scene. When you have filled out the information and are finished you need to select the blue button that says “Create a Scene”, however the thing that caught me out was nothing happens. The screen
  doesn’t return to the main menu and you do not get any feedback telling you if it has worked. Trust me it has and don’t keep hitting the button like I did as this is creating multiple scenes in your account. All you need to do is hit the button once and then go back to your dashboard where alongside your uploaded models you will see the scene you have created.
Right now here comes the cool part of this site. Select your scene and hit the play button you will see in the middle of the window where your scene
 should be. You will have to wait a minute with the 3dvia player is starting up and you should then be prompted to select and avatar if not asked before. The avatar is going to be the online you so have some fun if you want, but all the characters are fairly normal, sorry no glamour models or footy players.
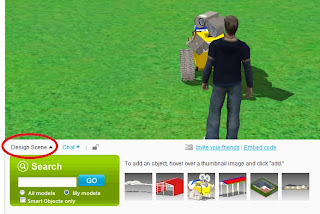
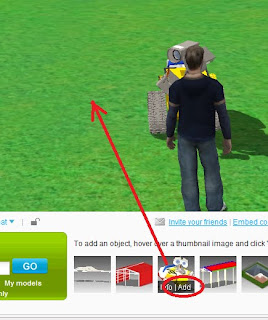
When the scene has loaded you will see an option in the right hand corner called “Design Scene” and this brings up a menu to search for models of wish there is a radio button to “my models” and this will show your uploaded models. To add your models to the scene, hover the cursor over the thumbnail of your model and you will see “add”. You need to left mouse button click the “add” and then left mouse button click in your scene to add the model. Drag and drop does not work. Your model will be tiny however, so what you will see are some white dots and you need to drag one of these which will scale your model.
 Once you have it at the right size you can also rotate it by hovering the cursor over the rotating arrows or move the model by hovering over the 4 way arrows. Now to stop adjusting it you can lock the model by a right mouse button click on the model which will bring up a menu of which you will see an unlocked padlock. Select the padlock and it will now lock the model size, position and orientation.
You are now ready to view your model and this is done via your avatar. To move the avatar you can use the arrow keys along with the mouse which will adjust where you are looking or just use the mouse by using a left mouse button click to select a point you wish to walk too. I prefer a combination of both, with the arrows keys for movement and the mouse for where I wish to look.
Your scene is complete and you can now share the experience by inviting other to look around. You will see a mail icon below the scene which says “invite your friends”. This will send them an email asking them to view your scene by going to 3dvia.com. They will need to create an account and once they have done so they will see an on their dashboard your scene. When they select this they will also be able to select an avatar and they can then roam around your scene with the models you have inserted.
It is a great online showroom and may even be a way of businesses operating without the usual constraints of real life showrooms. This technology would allow customers to walk around and take a look at the product you are offering or even of way of having design reviews online perhaps across different countries.I hope you give this a go and I am still discovering new aspects about this site myself, but I like what I have seen so far and wanted to share it.

No comments:
Post a Comment
Note: Only a member of this blog may post a comment.